Showing posts with label App Model. Show all posts

Wednesday, July 29, 2015

Creating our first SharePoint 2013 Hosted App - Image Slider (Part 2)

This is the second post in a series that discusses how to create an Image Slider using the SharePoint-hosted App Model.

  • Part 1 – Creating our first SharePoint 2013 Hosted App
  • Part 2 – Creating our first SharePoint 2013 Hosted App Part  (this post)
  • Part 3 – Creating a Settings Page for our SharePoint 2013 Hosted App Part (not published)

So far in this series, we have covered how to create an Image Slider using the SharePoint-hosted App Model, but it runs as a full-page app which isn't very useful for an Image Slider. In this post, we will cover how to convert the full-page app to a SharePoint App Part that can be added as a web part to any SharePoint page.


Let's start by opening up our Visual Studio project from the first post, and adding a new item to the project.


Select the Client Web Part (Host Web) template from the list of available items. The template is located under the Office/SharePoint header. Give your App Part a name... I called mine SliderAppPart. Yes, very creative, I know!


On the next screen, ensure that the option to Create a new app web page for the client web part context is checked. This will create a new page to use for our App Part, instead of using the Default.aspx page that we were working with in the previous post.


After clicking Finish, the new App Part page should be displayed. Add a reference to jssor.slider.mini.js after the jquery reference.


Add references to our App.css and App.js files.


Insert the following HTML markup inside the body element on the page. This contains the div element that will hold the images for the image slider.

<div id="slider_container" style="position:relative; top: 0px; left: 0px; width: 600px; height: 300px;">

    <!-- Slides Container -->
    <div id="slides" u="slides" style="cursor: move; position: absolute; overflow: hidden; left: 0px; top: 0px; width: 600px; height: 300px">
    </div>

</div>


Next, open the App Part settings by double-clicking on the App Part in the Solution Explorer. Give the App Part a Title and Description and set the DefaultWidth and DefaultHeight to appropriate values. I chose to use values that were 50 pixels larger than the Image Slider div width and height.


Now, open the App.js JavaScript file, and replace the text in the $(document).ready() function with the following code.

   if (typeof ExecuteOrDelayUntilScriptLoaded != 'function') {
        //Get the URI decoded SharePoint site url from the SPHostUrl parameter.
        var spHostUrl = decodeURIComponent(getQueryStringParameter('SPHostUrl'));

        //Build absolute path to the layouts root with the spHostUrl
        var layoutsRoot = spHostUrl + '/_layouts/15/';

        $.getScript(layoutsRoot + "SP.Runtime.js", function () {
            $.getScript(layoutsRoot + "SP.js", loadSharePointPictures);
        });
    }
    else {
        ExecuteOrDelayUntilScriptLoaded(loadSharePointPictures, 'sp.js');
    }


This ensures that the ExecuteOrDelayUntilScriptLoaded function has been loaded, prior to calling it. The App Part page does not load all of the SharePoint JavaScript files that the Default.aspx page loaded. If we deployed the App Part without making this change, we would encounter the following error:


The last change we need to make is to the AppManifest.xml. Double-click the file to open it, and replace the Start Page with the URL to the SliderImages library. This will set the SliderImages library as the default page when the Application is run.


Compile and deploy the app by pressing F5. The SliderImages image library should now be displayed by default. Click the link back to your development site located in the top-left hand side of the screen.

Create a new page to add our App Part onto by clicking the Settings icon, and selecting Add a Page.

Give the page a name (I called mine Test) and click Create.


The new page should open in Edit Mode. Click the Insert tab in the ribbon menu, and select the Web Part icon.


Our Image Slider App Part should show up under the Apps category, with the Title that we named the App Part. Select the App Part and click Add to add it to the page.


The Image Slider App Part should appear on the page now, but the display will be blank because we haven't loaded any images yet. Click Save to save the page, and exit Edit Mode.


Click the title of the Slider App Part to navigate to the SliderImages image library and upload the slider images into the library.


Once the images have been uploaded, click the link back to your development site located in the top-left hand side of the screen. Navigate back to the page that we created earlier. You should now see your images loaded and the Slider should be working now!


Saturday, July 18, 2015

Creating our first SharePoint 2013 Hosted App - Image Slider

This is the first post in a series that discusses how to create an Image Slider using the SharePoint-hosted App Model.


As you may know, SharePoint 2013 introduced a new App Model, which changed the focus from custom server-side code to client-side development. In this series, I will cover how to create a Slider app using the SharePoint-Hosted App Model and the Jssor jQuery image slider. The sample app will load images from a picture library located in the application site and display them in a Slider web part that can be placed on any site. In this first post, we will cover how to create a Slider SharePoint App, and the next post will expand on that to convert the App into an App Part that can be added onto any page.

To get started, download the Jssor slider files.

Create a new App for SharePoint project in Visual Studio.


On the Specify the app for SharePoint settings screen, select SharePoint-hosted app and enter the URL for SharePoint site that will be used to test and debug the slider app. In this example, the site that I am using is based on the Developer Site template.


After clicking Finish, a default App for SharePoint is created for you.


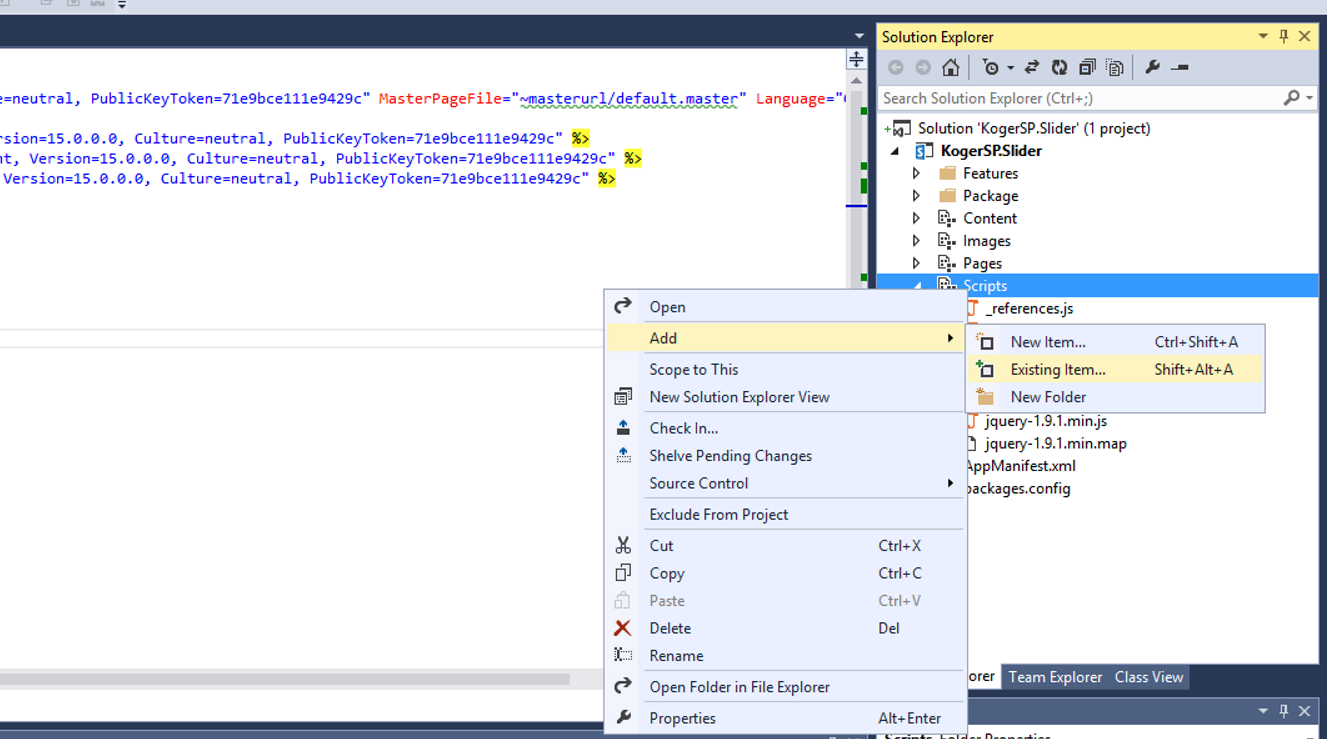
Add the Jssor script to the project by right-clicking on the Scripts folder and selecting Add --> Existing Item...


Select the jssor.slider.mini.js JavaScript file that we downloaded earlier, and add it to the project.


Open the Default.aspx page located in the Pages folder, if it is not already open.
Add a reference to the jssor.slidi.mini.js JavaScript file in the page head section.


Replace the Page Title text in the PlaceHolderPageTitleInTitleArea with the name of your Slider App.


Replace the text in the PlaceHolderMain ContentPlaceHolder with the following HTML markup:
 
<div id="slider_container" style="height: 300px; left: 0px; position: relative; top: 0px; width: 600px;">

        <!-- Slides Container -->
        <div id="slides" style="cursor: move; height: 300px; left: 0px; overflow: hidden; position: absolute; top: 0px; width: 600px;" u="slides"> 

        </div>

</div>         


Now, open the App.js JavaScript file, located in the Scripts folder, and remove the existing functions, other than the $(document).ready() function.


Select the code in the $(document).ready() function, and replace it with the following code. This tells the Slider to start sliding images when the page is loaded.
options = { $AutoPlay: true };


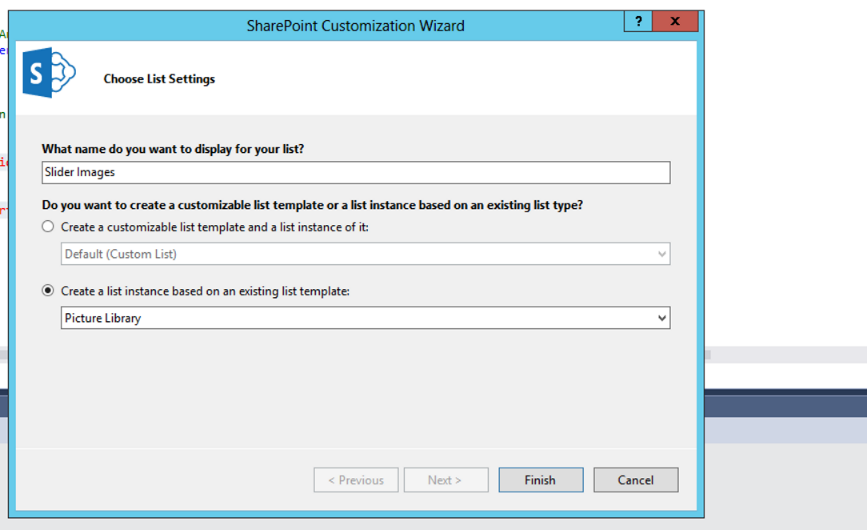
Now, add a new SharePoint list called SliderImages to the project, based on the Picture Library list template. This library will hold the images that we use to display in the Slider.


After the Slider Images list is created, give it a description, and make a note of the List URL. We will need this later when we upload the images to be used by the slider. I removed the space in the List URL, so in this example, the List URL is Lists/SliderImages


Now, open the App.js JavaScript file, and add the following line to the top of the script.
var options = null;
var pictures = null;


Add the following code after the $(document).ready() function in the App.js JavaScript file. This script loads the images from the SliderImages library that we just created and inserts them into the slides div in the Default.aspx page. Once all the images are loaded, it calls the JssorSlider function to start the Image Slider.

ExecuteOrDelayUntilScriptLoaded(loadSharePointPictures, 'sp.js');

function loadSharePointPictures() {
    //fetch the list of items using the client object model
    var context = new SP.ClientContext.get_current();

    //get the current website
    var web = context.get_web();

    //get the pictures list
    var list = web.get_lists().getByTitle('Slider Images');

    //create the query to get all items
    var query = SP.CamlQuery.createAllItemsQuery();

    //get all items from the query
    pictures = list.getItems(query);

    //load the context
    context.load(pictures, 'Include(FileRef)');

    //execute the query in async mode
    context.executeQueryAsync(
        Function.createDelegate(this, success),
        Function.createDelegate(this, failed));
}

function success(sender, args) {
    var pictureArray = new Array();
    var pictureCount = 0;

    var enumerator = pictures.getEnumerator();

    while (enumerator.moveNext()) {
        var currentItem = enumerator.get_current();
        var filename = currentItem.get_item('FileRef');
        pictureArray[pictureCount++] = filename;
    }

    var newHtml = '';

    for (var i = 0; i < pictureArray.length; i++) {
        newHtml += '<div><img u="image" src="';
        newHtml += pictureArray[i];
        newHtml += '"/></div>';
    }

    $('#slides').html(newHtml);

    var slider = new $JssorSlider$('slider_container', options);

}

function failed(sender, args) {
    alert(args.get_message());
}


You should be able to run the App now, although nothing will actually be displayed because we haven't uploaded any images yet. Press F5 to compile and deploy the app.


To upload images, you have to navigate manually to the SliderImages picture library that we created earlier. To do so, click in the address bar and highlight everything after the name of your Slider app.


Replace the highlighted text with the location of your SliderImages library. If you have been following along with this blog, it should be located at /Lists/SliderImages.

After you have navigated to your Slider Images library, you can upload some pictures into the library to be used by the slider.


Once you have some pictures loaded, click on the Site Icon, or the link for your Slider App, to return to the App home page. You should now see your images loaded and the Slider should be working now!

Now that we have a working slider, it still isn't very functional. In order for this slider to work, you have to actually navigate to the Slider App, which takes up the full screen, and you lose your SharePoint context, which isn't very useful. In the next blog post, we'll cover how to convert this SharePoint App into a SharePoint App Part that can be loaded onto any page.

Blog Archive